
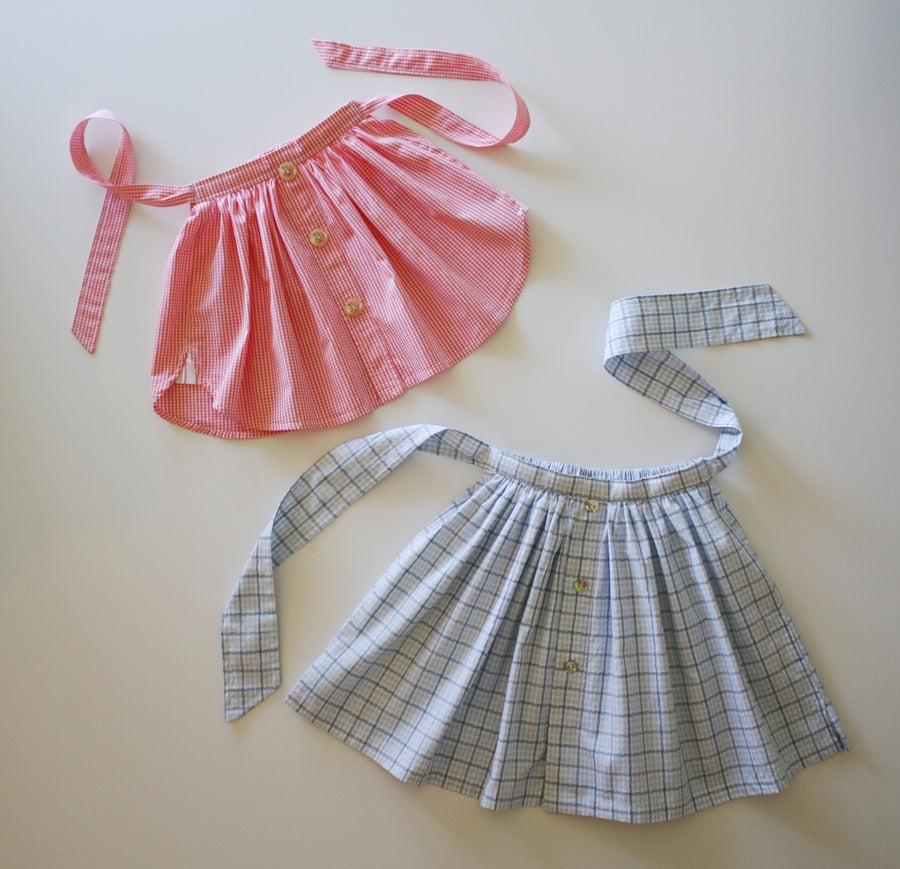
Curved shirt tail hems are having a fashion moment this spring, so I thought it would be fun to upcycle some actual shirts into skirts for little girls.

It's a super easy sewing project (no hemming!) which you can do in an hour or two, and requires little more than a nice cotton shirt, matching thread, a length of 1" elastic, a swatch of fusible interfacing, and maybe some fun buttons. If you find shirts large enough and are not super tall, you can make one for yourself as well!
This is a really cool design in that it is completely clean finished inside and out - no raw edges to serge - and the built in placket makes a sweet detail. Scroll to the end for photos of the finished project which will make the long tutorial worth it!
Quick note - I am having camera issues and apologize in advance for the different brightness in each photo.
-
So, first, find a shirt. Men's shirts tend to be made out of nicer cottons than most things, and maybe Dad's Easter shirt from last year was a fun gingham or pastel stripe. Look for nice shirt-tail details. I went to my local thrift and picked up an lovely XL pale blue woven windowpane shirt with a basic notch hem, and then checked out the ladies section for a peach gingham with stripe insets at the side seams (bonus!). Ladies shirts will work fine as long as they do not have princess seams or darts.

-
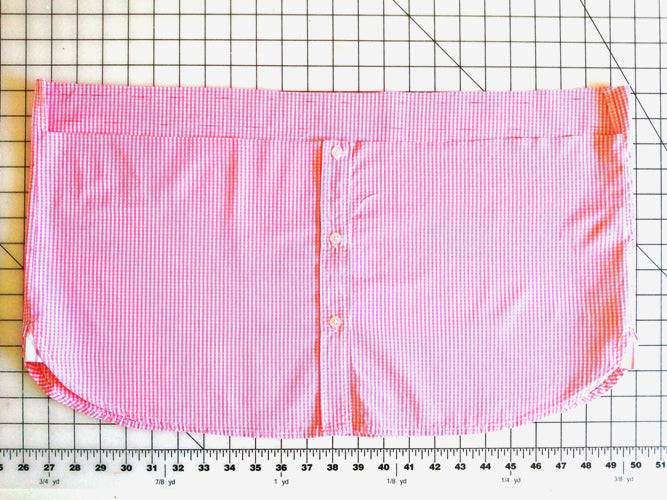
Now, a bit of measuring: Find out how long you want the finished length of the skirt to be, from belly button to hem. On my sample it was 11". Add 2 1/2" to this for the waistband, so mine is 13 1/2" for the total length. Neatly lay out your shirt flat. Measure the total length up from the hem, continue the measurement all the way across, and cut. This is the "skirt" part of the skirt.

Now comes measuring for the waistband, which is a band on the front and elastic in the back. Make sure to read through the following steps before cutting anything, there is method to my madness I promise.
Turn the skirt inside out and lay it with the back (side with no buttons or placket) up. We're going to do the marking here so it won't show on the finished garment. Here I'm starting next to the side seam to mark the waistband across the back. This photo is just to show the placement:

And in the following one you can read what the measurements are. You don't have to mark them all, I'm just outlining what each section will be used for. You really only need a line 2 1/2" from the top.


-
Flip it over so you are looking at the wrong side of the front. In my picture here you can see the side seam where the front meets the back. Mark off 2" from the top and cut it off, leaving the selvedges of the side seams attached to the back. This is where we will attach the waistband to the front. Below this we are left with a 1/2" seam allowance.
Turn it right side, press it, and this is what you should have now:
-
Put in the elastic back waistband:Measure the little one's waist. I'm using a little girl with a 20" waistline for my sample.Cut a piece of 1" wide elastic half as long as the waist measurement plus 1" for seam allowances. Mine came to 11".
To create the casing: Fold to the inside the 1/2" seam allowance at the top back of the skirt and press. Then fold down another 1 1/4" and press. It is easier to work on this part if you open up the buttons and lay it flat.

Stitch 1 1/8" from the folded edge to create the channel for the elastic to go through. Using a loop turner or safety pin, pull your measured length of 1" elastic through and pin it on either end to hold in place.

A full view from the wrong side:

Back waist = done! Set it aside for the moment.
-
Sashes: Skirts are more fun with a bow or knot in the back, and ours here serves the dual purpose of neatly covering the elastic waistband. Find the top portion of the shirt and cut those sleeves off.

Cut them open along the underarm seam, cut off the cuff, and iron them out flat. Mine had little tabs with buttons which I also had to work around and remove.


Fold the sleeve with the right sides together so we can mark the sashes. Marking directions in just a second....
A brief digression on styles of sashes:Your sashes can be any width you like, but the wider they are, the longer they have to be to make a bow, and the length is limited by the length of the sleeves. On my blue skirt, I made them wide to tie in a layered knot:

On my peach gingham skirt I made them only 1 1/2" wide and they can be neatly tied in a bow:

So, on the fold, mark each sash the width you prefer plus 1/4" seam allowance. I like an angled end on mine:

Cut, and sew, leaving the non-angled end open. Clip your corners.

Use a loop turner to turn them, then neatly press and topstitch 1/4" from the edge. Make sure they are the same length! If not, trim the open ends so that they are..

Make a pleat in each so that the ends are 1" wide - the same as the waistband.

Pin each on top of the ends of the elastic on each side, and sew in place through all layers with a 1/2' seam allowance.

-
Sew the placket closed. We are going to sew the front placket closed so this skirt cannot open at center front anymore. Now is a good time to go ahead and remove the buttons if you plan on replacing them. Pin the placket closed, and topstitch a straight seam on top of one of the placket seams to about 3" away from the hem, so that it looks like it still works.

-
Gathering the front of the skirt: To get ready to attach the front waistband, set your sewing machine to the longest stitch and sew two parallel lines of stitching along the front edge of the skirt, one 1/4" away from the edge and another 1/2" away from the first. Do not backstitch at the beginning or end and leave the threads long.
Take hold of the long bobbin threads and gently pull from each end to gather the front of the skirt. Try to keep the center placket flat and not gathered. This is a view from the right side.

Now we are ready for the almost last step, the front waistband!
-
The front waistband: Find the top back of the shirt and cut it off below the yoke so you have a flat piece of fabric. We are going to make the waistband here, the measurements are coming up next. If you plan on making several of these skirts from different shirts, you might want to make this as a paper pattern.

Remember the little one's waist measurement? Divide the measurement in 2, then add 1" (two 0.5" seam allowances) - so my front waistband will be 11" wide, and the height we need for a 1" waistband is 3 1/4", as detailed below:

Cut a rectangle of fusible interfacing 2" by half the width of the waist measurement, and press it on so that it is centered 1/4" away from one long edge.

Fold down the 1/2' at the top and press, then fold down 1 1/2" and press, like this:

Turn around and line up remaining 1/2' seam allowance with gathered edge of skirt and pin, leaving 1/2" free at each end.

Stitch 1/2" from raw edges, again leaving 1/2" free at each end. Remove gathering threads and folding 1/2" edges to the wrong side, fold waistband up and around to the inside of the skirt. This encloses the gathered edges inside the waistband, as well as the seam allowances from the back of the skirt. Pin in place - it should look like this from the front:


Carefully stitch the ends in place through all thicknesses, then stitch in the ditch along the edge of the gathering to hold the waistband down in the back and finish the inside. Pin it before you do this and go slow for best results!

Give it a good pressing all over.
Finally, I like to topstitch along the waistband 1/4" from the edges for a neat look, and you can sew your cute buttons on now.
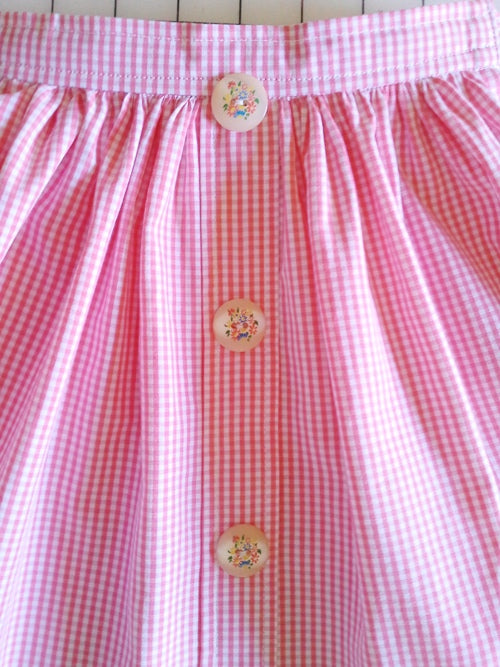
More pretty buttons:

Et voila!!!!! So cute!!!


See the curved side hem?

This one is a bit longer and has a 1950's feel:


